User Manual · Original Instructions

Tray Washer

Trays 1020, up to 3″ tall Needs Your own pressure washer, 4 GPM and 2000 PSI
Download PDF
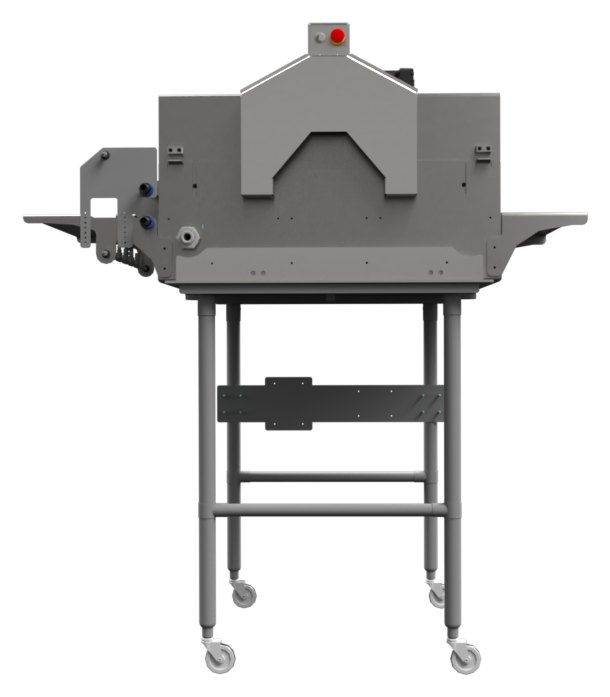
The Tray Washer, front view: intake shelf, wash chamber and outtake shelf
Before you startPart 1 of 4

Introduction

Thank you for choosing the Rooted Robotics Tray Washer. Designed specifically for 10″ x 20″ trays, this machine simplifies the cleaning process—boosting efficiency, consistency, and ease of use. Built for durability and flexibility, the Tray Washer is a valuable addition to any controlled environment agriculture operation, regardless of size. Its high-pressure spray system, adjustable drive speeds, and height-adjustable wash chamber allow for thorough cleaning across various tray types without the need for excessive manual labor.

This manual will walk you through setting up the washer, selecting the appropriate speed, adjusting height settings, and performing regular maintenance. By automating a traditionally time-consuming task, the Tray Washer reduces water use, labor costs, and cleaning time—helping you maintain a clean operation and focus more on growing.

Product overview

The Rooted Robotics Tray Washer arrives fully assembled and ready to use. Operators will need to supply a compatible pressure washer, either by using an existing one or selecting from our recommended options based on available power and water flow. To get started, simply unbox the machine, connect your pressure washer, and plug it in. With intuitive controls, users can choose from three preset drive speeds and adjust the wash chamber height to accommodate different tray types. The straightforward design makes the washer easy to clean and maintain, offering a reliable, long-lasting solution for farms looking to reduce labor and streamline tray sanitation.

Key benefits

Using the Rooted Robotics Tray Washer brings a range of benefits to your farm, helping you cut labor costs, save time, and maintain a clean operation:

  • Fast ROI: Automating the tray cleaning process significantly reduces labor hours and water usage, allowing farms to recover their investment quickly.
  • Consistent Cleaning Results: With three preset speeds and height adjustability, the washer delivers reliable, thorough cleaning for different soil levels and tray depths.
  • Ease of Use: Simple controls make it easy for operators to adjust settings, minimizing training time and fitting seamlessly into your workflow.
  • Durability and Low Maintenance: Built from stainless steel and off-the-shelf parts, the washer is corrosion-resistant, easy to clean, and made for long-term use with minimal upkeep.

How this manual helps

This manual is designed to guide you through the setup of your Tray Washer. It provides the essential steps to get your machine operational, including connecting a pressure washer, setting the wash chamber height for your trays, and choosing a drive speed. Achieving the best results will require some fine-tuning based on how soiled your trays are and how your workflow runs. By testing different speeds and chamber heights, you will find the settings that clean thoroughly without slowing your line. Regular cleaning and maintenance will ensure long-term reliability and minimal downtime.

About us

Rooted Robotics is committed to providing innovative automation solutions for controlled environment agriculture. Our team of engineers, designers, and industry experts works to develop affordable and effective tools that empower growers to operate more efficiently and profitably. With our expertise in automation and farm operations, we are dedicated to equipping farms with intelligent, interfacing machines that enhance productivity and sustainability.

Intended use

The Tray Washer is designed for cleaning, removing dirt and root media, and sanitizing standard 1020 grow trays (up to 3 inches tall) in controlled environment agriculture facilities.

Intended OperatorsTrained Adult operators in commercial agriculture settings.
Intended EnvironmentIndoor, dry, temperature-controlled facility with appropriate electrical supply.
Operating Limits110V AC (US), 230V AC (EU).
  • Do NOT operate with guards removed or safety devices disabled.
  • Do NOT use outdoors or in wet conditions.
  • Do NOT use with trays exceeding 3 inches in height or non-1020 format trays.
  • Do NOT operate the machine without reading this manual and watching setup videos.
  • Do NOT allow untrained or unsupervised persons to operate the machine.

Safety information

Signal Words and Symbols

DangerIndicates a hazardous situation that, if not avoided, will result in death or serious injury.
WarningIndicates a hazardous situation that, if not avoided, could result in death or serious injury.
CautionIndicates a hazardous situation that, if not avoided, could result in minor or moderate injury.

Residual Risk Warnings

  • Pinch points exist at the conveyor belt and rollers. Keep hands, hair and loose clothing clear of the belt feed area during operation.
  • The machine contains voltages up to 110V AC (US) or 230V AC (EU) internally. Do not open the control panel enclosure.

Recommended Personal Protective Equipment (PPE)

  • Cut resistant gloves for normal operation, belt inspection, belt changes, and manual belt tracking checks.
  • Safety glasses for normal operation, cleaning with compressed air, cleaning with sanitizers.
  • Hearing protection for compressed air use.
  • Closed toed shoes for all stages of machine life cycle.

Emergency Stop

  • The E-stop button is located in the middle of the control panel, under the soft kill switch. The e-stop has a bright red mushroom head with a yellow background making it easily identifiable.
  • To activate the E-stop, press it in firmly. Upon this press all motor power is cut from the machine.
  • To reset the machine, twist the E-stop button clockwise to release. The machine will NOT restart automatically, the operator must initiate a deliberate restart sequence.
  • The E-stop should be used any time an unsafe condition is observed, when any injuries occur, or at any point the operator feels unsure about the machine behavior. The E-stop must also be activated for routine cleaning and maintenance.

Transport, handling and storage

  • Always use designated lifting points and grip locations.
  • Machine mass: 115lbs (52 kg) – requires minimum two (2) people and/or mechanical aid to lift.
  • Dimensions: 48.5 x 29 x 20 in (1231.9 x 736.6 x 508 mm)
  • WARNING: Sharp edges inside packaging – wear cut resistant gloves during unpacking and setup.
  • Stability requirements for work surface: minimum surface dimensions, weight capacity >120 lbs, level, non-slip.
  • Storage conditions: indoor, dry, ambient temperature.
  • Clear workspace of tripping hazards (packaging materials) before positioning machine.

Workstation

  • The Operator(s) for the Tray Washer machine should place the washer at a comfortable working height, with the tray intake shelf located around chest level. Ensure the washer is located on a stable surface on dry floor to prevent slipping.
  • The operator(s) should be located at the infeed side of the machine when loading trays into the washer and the outfeed side when collecting the washed trays.
  • When placing 1020 trays onto infeed belt, operator should NOT manually push trays towards the spray assembly, instead allowing the wheels to catch trays and direct them towards spray assembly.
  • Allow multiple feet of space between the machine and all walls or other machinery to allow for smooth operation, maintenance and cleaning.
  • Before operation of the machine, ensure no untrained bystanders are in the operating zone of the machine.
Setting upPart 2 of 4

Setup and calibration

The Rooted Robotics Tray Washer arrives mostly assembled, requiring minimal setup to begin use. Follow these steps to properly set up and calibrate your machine:

  1. Pre-soak trays in a dilute acidic cleaner solution such as a quat cleaner to vastly improve the machine’s performance, and we recommend this for all users. This step will loosen stubborn roots and media as well as softening enzymatic films that are difficult to pressure wash off with water alone.
  2. Place the washer on a level surface and confirm clear drain flow.
  3. Connect your pressure washer and water supply then plug in the machine. The unit uses a separate pressure washer for operation, while the machine itself is cleaned with a hose, not a pressure washer.
  4. Adjust the wash chamber height by loosening chamber height adjuster bolts, placing a tray under both drive wheels, and retightening the chamber height bolts. Run a tray through and confirm that the tray feeds well. Adding more compression to the chamber will improve feed traction; reducing compression will reduce stress on the trays.
  5. Confirm that the two drive belts rotate smoothly under their bolted metal housing. Tension can be added to the drive belts by loosening the tension lock bolts and then adjusting the tension bolts on the tension plate.
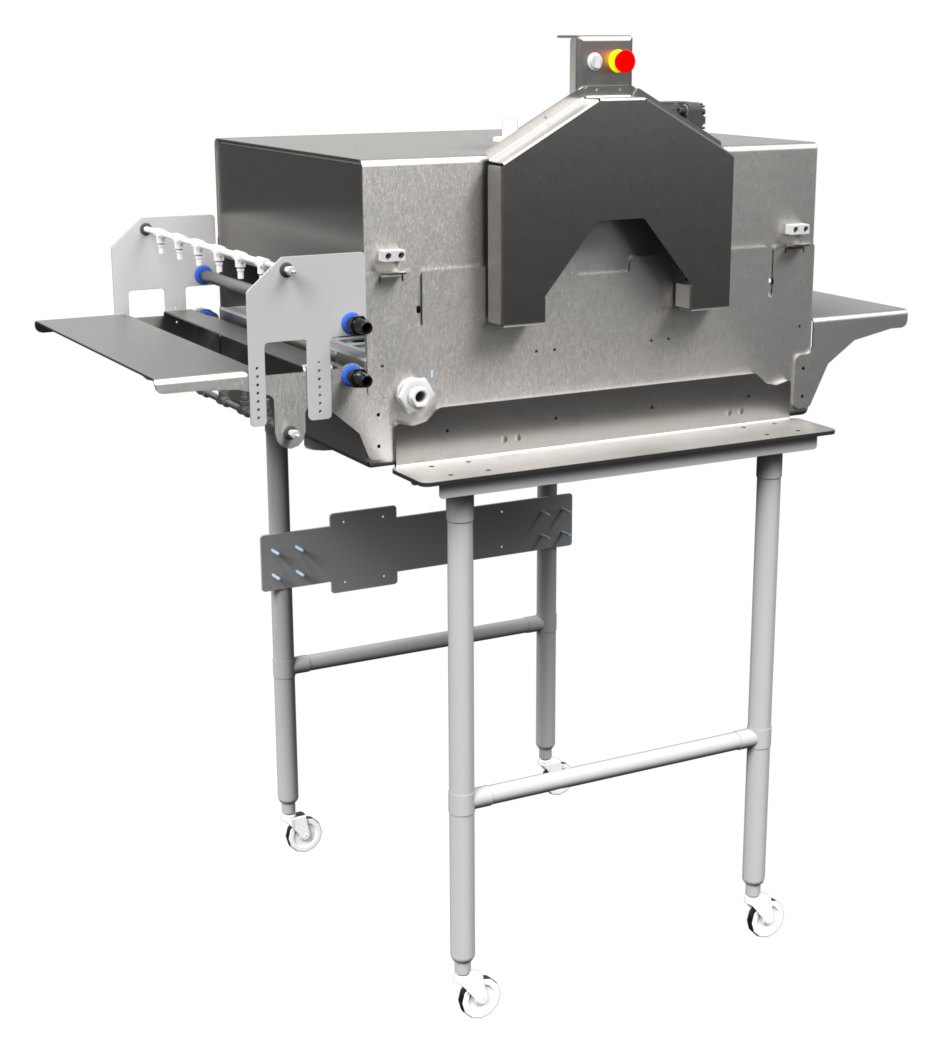
The Tray Washer from the intake side
The intake side, where trays are loaded.
Your pressure washer

We recommend a unit, or a combination of two smaller ones, that puts out no less than 4 gpm and 2000 psi to run this machine. We recommend one of these two:

  • Canpump Electric Pressure Washer: 7.5 hp Nicolini Motor 230/460 V, Triplex Pump
  • Canpump Cold Water Sewer Jetter: 13 hp Engine, 3600 psi at 4.7 US gpm

Running trays

  • Three drive speeds. Choose a slower setting when dealing with tougher debris, and a faster one for lightly soiled trays.
  • Chamber height is set by hand, not from the controls. Set it once for the tray type you run, as described in setup, and re-check it whenever you change tray type.
  • Let the wheels take the tray. Load trays onto the intake shelf and let the drive wheels catch them. Do not push trays into the spray assembly.
  • Pre-soaking pays off. Trays soaked in a dilute acidic cleaner come out cleaner at any speed, and let you run faster.
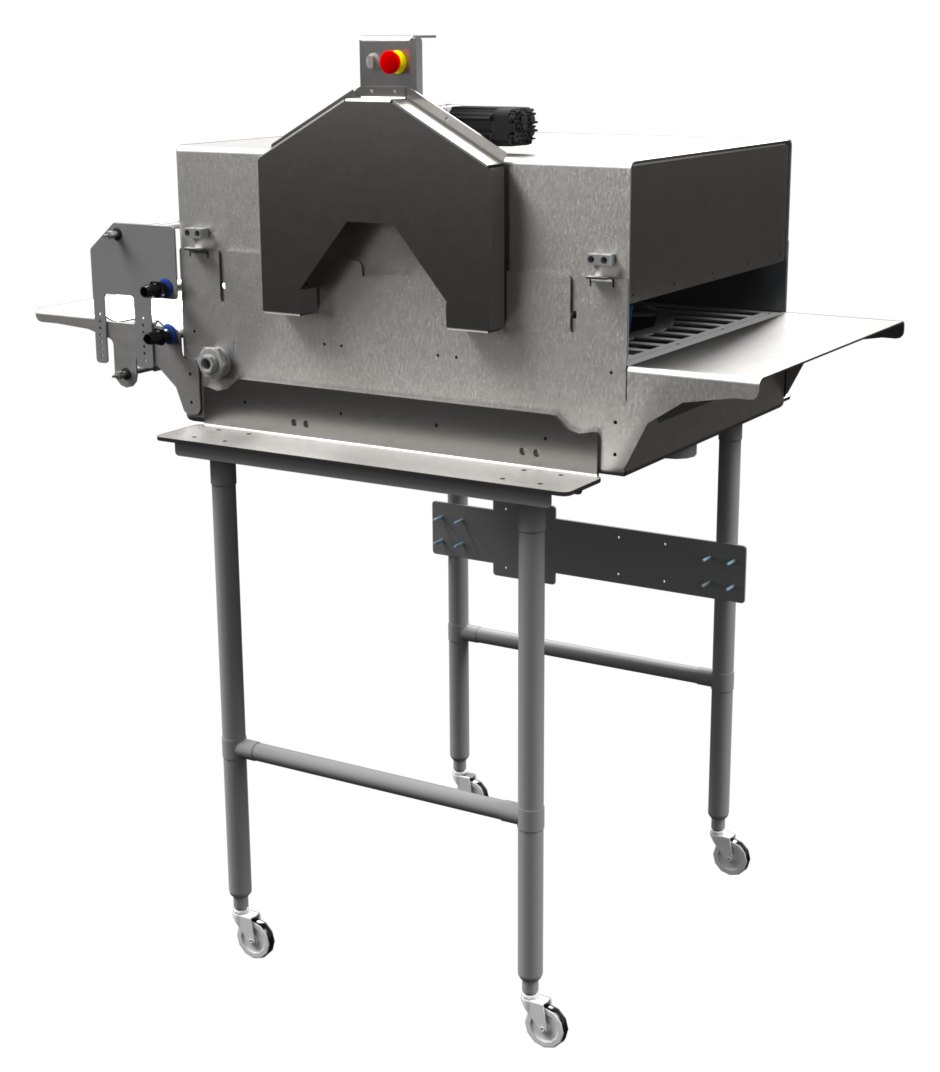
The Tray Washer from the outfeed side
The outfeed side, where washed trays are collected.
CarePart 3 of 4

Cleaning procedures

Caution

Always be sure that the e-stop is engaged and the power is unplugged before attempting to perform inspection and maintenance.

Purpose

Keep tray path and interior surfaces free of debris so spray coverage and tray travel remain consistent.

Approved agents and methods

  • Use potable water, food grade detergents, peroxide or peracetic acid based sanitizers per label.
  • Do not use chlorinated cleaners.
  • Wipe or hose with a handheld nozzle. Do not use a pressure washer to clean the outside of the machine: electrical components and drivetrain components will be compromised by a pressure washer.

Routine cleaning during operation

  • Periodically hose inside the chamber until water runs clear. Keep nozzles and the tray inlet and outlet areas free of debris.
  • If the sanitizer add on is installed, keep the sanitizer container covered and free of debris to prevent nozzle clogging and ensure sanitizer effectiveness.

End of day cleaning

  1. E-stop, disconnect power and ensure there is no motion in the drive wheels.
  2. Open the cleaning chamber by removing the spray baffle screws on the chamber top to remove chamber spray baffles, and spray inside the washer to clear debris from the washer basin.
  3. Hose down the brush baffle, as this will collect the most debris of any part of the machine. Failure to clean this will present a food safety risk. The user can choose to remove the brush baffle upon receipt of the machine if they decide that they are willing to accept more spray coming out of the machine in exchange for easier daily cleaning.
  4. Clean exterior panels and touch points by hosing off debris and then wiping down with a cleaning cloth.
  5. Apply a food grade sanitizer (we recommend a peracetic acid based cleaner) and follow sanitizer manufacturer directions.

Deep cleaning (as needed)

  • Remove the top of the clamshell by loosening the chamber height adjustment screws to gain full access and spray the interior surfaces and corners.
  • Avoid directing water into motors, bearings, or the electronics enclosure.
  • Inspect and clear drain paths so water cannot pool.

Do and do not

  • Do remove the outer flaps daily and spray inside the washer.
  • Do remove the clamshell top for deep access when buildup persists.
  • Do not use chlorinated cleaners.
  • Do not use a pressure washer on the outside of the machine.

Maintenance and replacement intervals

Before each use
  • Verify emergency stop and controls function.
  • Observe both drive belts during start up for tracking, smooth running, and unusual noise.
  • Check for leaks at hose connections and for loose hardware at the clamshell, flaps, and height adjust points.
Weekly
  • Check belt tension is within adjuster range; if adjusters approach end of travel, plan belt replacement.
  • Inspect nozzle condition and pattern; replace clogged or damaged tips.
Every 5,000 trays
  • Expose the drive belt system by unscrewing the four belt cover screws and removing the drive belt cover.
  • Replace either drive belt if glazing, fray, splice lifting, or persistent slip remains after tensioning and tracking adjustments.
  • Inspect tray guides and internal brush spray baffles for wear or warping that affects tray travel; replace as needed.
  • Verify torque on enclosure and guard fasteners; replace damaged hardware.
  • Unscrew the sanitizer mist nozzles. Clean any debris off the nozzle and soak the nozzle in a mild vinegar solution to descale any build up on the nozzle that will reduce sanitizer spray homogeneity.
Every 25,000 trays
  • Expose the drive belt system by unscrewing the four belt cover screws and removing the drive belt cover.
  • Replace either drive belt if glazing, fray, splice lifting, or persistent slip remains after tensioning and tracking adjustments.
Every 100,000 trays
  • Check drive and idler shaft bearings. If the bearings have worn out to the point that the shaft is rubbing on the chamber walls, replace the bearings. All bearings are sealed and never require greasing.
As needed
  • Replace pulleys showing groove rounding, cracking, wobble, or hub loosening.
  • Replace worn tray guides or shields that cause misalignment or drag.
  • Replace any wiring, connectors, or strain reliefs showing abrasion, cuts, cracked housings, or loose or broken latches.
Notes
  • All bearings are sealed and are not to be greased.
  • Do not use chlorinated cleaners.
  • Do not use a pressure washer.
If something goes wrongPart 4 of 4

Troubleshooting and emergency procedures

Emergency Stop (E-Stop) procedure

The Tray Washer is equipped with a prominently placed Emergency Stop button. In the event of any unsafe condition, malfunction, or emergency, follow this procedure:

  • Press the E-Stop button firmly. The machine will immediately de-energize all motors and the water pump.
  • Do not attempt to restart the machine until the cause of the emergency has been identified and resolved.
  • If the issue involves electrical damage, water intrusion into electrical components, or any sign of overheating or smoke, disconnect the machine from the mains power supply (unplug from wall outlet) before proceeding.
  • To reset the E-Stop: twist the button clockwise (or pull outward, depending on model) until it releases. The machine will not restart automatically — you must reinitiate the start sequence from the control panel.
  • If the E-Stop button does not engage properly, does not stay depressed, or pops back out on its own, stop using the machine immediately and contact Rooted Robotics support. Do not operate the machine with a malfunctioning E-Stop.

Post-emergency assessment

After pressing the E-Stop and before resuming operation, conduct the following assessment:

  1. Visually inspect the machine for any obvious damage, debris, or misalignment.
  2. Check the wash chamber and conveyor belt area for jammed or damaged trays.
  3. Inspect electrical cables and connections for damage, moisture, or loose fittings.
  4. Inspect the spray bar nozzles for blockages or physical damage.
  5. If the machine stopped due to a tray jam, clear the jam following the tray jam procedure below before restarting.

Tray jam clearance procedure

  1. Press the E-Stop button to halt all machine operation.
  2. Disconnect the machine from the mains power supply (unplug the power cord).
  3. Keep the power cord visible and within your line of sight while working.
  4. Wearing protective gloves, carefully remove the jammed tray. If the tray is wedged, gently work it back and forth — do not use excessive force as this may damage the conveyor or guide rails.
  5. Inspect the conveyor belt, rollers, and guide rails for any debris or damage resulting from the jam.
  6. Make any necessary adjustments to correct it.
  7. Reconnect power, reset the E-Stop, and perform a test run with an empty tray before resuming production.

Electrical emergency procedure

  1. Disconnect the machine from the mains power supply at the wall outlet or circuit breaker panel.
  2. Do not attempt to open the control enclosure or inspect internal wiring.
  3. Allow the machine to cool and ventilate before approaching.
  4. Document the incident (photographs, description of what occurred) and contact Rooted Robotics support immediately.
  5. Do not reconnect or restart the machine until it has been inspected and cleared by Rooted Robotics or a qualified electrician.

Decommissioning and disposal

Preparing the machine for decommissioning

  1. Press the E-Stop button and disconnect the power cord from the wall outlet.
  2. Shut off and disconnect the water supply. Drain all water from the wash chamber, hoses, pump, and drain tub. Allow the system to drain completely.
  3. If a sanitizer system is installed, drain and flush the sanitizer reservoir and all associated tubing. Handle chemical waste in accordance with the Safety Data Sheet (SDS) for the product used and applicable local regulations.
  4. Run a final rinse cycle with clean water, if possible, to flush residual chemicals from internal components.
  5. Allow the machine to dry thoroughly. If the machine will be stored before disposal, leave all covers and access panels open to promote ventilation and prevent mold or corrosion.

End-of-life procedures

  • Safe shutdown and decommissioning procedure: E-stop, unplug, wait, de-tension the drive belts, verify zero energy.
  • Electronics disposal: follow local WEEE/e-waste regulations.
  • Frame and structural components: stainless steel recycling.
  • Transport safety during removal: same lifting requirements as installation.

Technical specifications

Features

  • Powerful Cleaning: Uses two spinning pressure washer bars for thorough interior and exterior coverage.
  • Three Speed Options: Select slower settings when dealing with tougher debris.
  • Simple Operation: Runs with straightforward controls for quick plug and play use.
  • Add On Ready: Designed to integrate the air knife and sanitizer bar for added food safety.
  • Durable Construction: Built to withstand long-term use.
  • Energy Efficient: Low power consumption for cost-effective operation.
  • Low Maintenance: Easy to maintain, clean, and store.

Physical specifications

Overall unit L x H x W (in)48.5 x 29 x 20
Overall unit L x H x W (mm)1231.9 x 736.6 x 508
Drive unit length (in) [mm]34 [863.6]
Tray receiver length (in) [mm]14.5 [368.3]
Weight115 lbs (52.2kg)
MaterialSTAINLESS STEEL
Tray compatibility1020 GROW TRAYS UP TO 3" TALL

Input power and water requirements

Voltage110V AC
Peak amperage20A
Avg. amperage6A
Avg. power consumption660W
Pressure washer GPM (or collective GPM)4 GPM
Pressure washer PSI (or collective PSI)2000 PSI
ApplicationsMicrogreens
Baby greens
Micro herbs
Available add-onsAir knife
Sanitizer spray module

Certification

This machine is CE certified.

Customer support

For additional assistance or troubleshooting about your Tray Washer, our team is here to help. Please contact us at: